

Unity is one of the most popular game engines in the world of video game development. However, despite its power and versatility, it is not uncommon to encounter technical issues, especially when exporting an application. One of the common errors developers face is: "Could not resolve all files for configuration ':launcher'." This error can be frustrating, but fortunately, it can be resolved by following a few specific steps.
This error can occur for various reasons, but it is generally related to conflicts or dependency resolution issues during Android project generation. In this article, we will explore in detail how to resolve this specific problem in Unity 2022.3.28f1, although the method applies to other recent versions as well.
Context and cause of the error
The error "Could not resolve all files for configuration ':launcher'" often occurs during the export step of your Unity project to Android. This error is related to the Gradle process, the build tool used by Android to compile and package applications. Gradle manages project dependencies, including external libraries (SDKs), and when it cannot resolve one or more of these dependencies, the error occurs.
In this particular case, installing the Unity Ads Mediation plugin likely introduced new dependencies that are not compatible with the current Gradle configuration. The default repositories in Unity may not contain all the references needed to resolve these new dependencies, hence the error.
Step 1: Enable custom Gradle templates
The first step to resolve this error is to enable custom Gradle templates. Unity allows customizing the Gradle files used during the Android build. This is essential to add additional repositories that may contain the dependencies required by the Ads Mediation plugin.
To enable custom Gradle templates, follow these steps:
- Go to the File menu in Unity.
- Select Build Settings.
- In the window that opens, click on Player Settings.
- In the Publishing Settings section, check the Custom Main Gradle Template, Custom Launcher Gradle Template, and Custom Gradle Settings Template boxes.
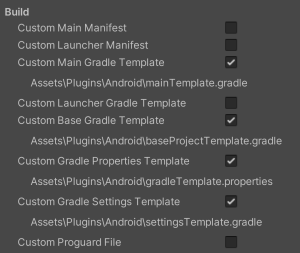
These options will generate custom Gradle template files that you can modify to add the repositories needed to resolve the dependencies.
Step 2: Modify the settingsTemplate.gradle file
Once custom Gradle templates are enabled, the next step is to modify the settingsTemplate.gradle file to add the missing repositories. Here is how to proceed:
- Navigate to Assets > Plugins > Android in your Unity project.
- Open the settingsTemplate.gradle file with a text editor.
- In the dependencyResolutionManagement section, add the missing repositories.
Here is an example of what the modified file might look like:
gradleCopier le codepluginManagement {
    repositories {
        **ARTIFACTORYREPOSITORY**
        gradlePluginPortal()
        google()
        mavenCentral()
    }
}

include ':launcher', ':unityLibrary'
**INCLUDES**

dependencyResolutionManagement {
    repositoriesMode.set(RepositoriesMode.PREFER_SETTINGS)
    repositories {
        **ARTIFACTORYREPOSITORY**
        google()
        mavenCentral()
        flatDir {
            dirs "${project(':unityLibrary').projectDir}/libs"
        }
    }
}
Similarly, modify the mainTemplate.gradle file and the launcherTemplate.gradle file to include the same repositories:
gradleCopier le codepluginManagement {
    repositories {
        **ARTIFACTORYREPOSITORY**
        gradlePluginPortal()
        google()
        mavenCentral()
    }
}

include ':launcher', ':unityLibrary'
**INCLUDES**
By adding these repositories, Gradle will be able to search for missing dependencies in additional sources, which should resolve the error.
Step 3: Modify the mainTemplate.gradle file
In addition to modifying the settingsTemplate.gradle file, it is also necessary to modify the mainTemplate.gradle file. Here is how to proceed:
- Open the mainTemplate.gradle file located in Assets > Plugins > Android.
- Add the additional repositories in the repositories section.
Here is an example of what the modified file might look like:
gradleCopier le codeplugins {
    // If you are changing the Android Gradle Plugin version, make sure it is compatible with the Gradle version preinstalled with Unity
    // See which Gradle version is preinstalled with Unity here https://docs.unity3d.com/Manual/android-gradle-overview.html
    // See official Gradle and Android Gradle Plugin compatibility table here https://developer.android.com/studio/releases/gradle-plugin#updating-gradle
    // To specify a custom Gradle version in Unity, go do "Preferences > External Tools", uncheck "Gradle Installed with Unity (recommended)" and specify a path to a custom Gradle version
    id 'com.android.application' version '7.1.2' apply false
    id 'com.android.library' version '7.1.2' apply false
    **BUILD_SCRIPT_DEPS**
}

task clean(type: Delete) {
    delete rootProject.buildDir
}
And do the same for the launcherTemplate.gradle file:
gradleCopier le codeallprojects {
    repositories {
        **ARTIFACTORYREPOSITORY**
        google()
        mavenCentral()
        flatDir {
            dirs "${project(':unityLibrary').projectDir}/libs"
        }
    }
}
After adding these modifications, try to rebuild your project. The error should be resolved.
gradleCopier le codeplugins {
    // If you are changing the Android Gradle Plugin version, make sure it is compatible with the Gradle version preinstalled with Unity
    // See which Gradle version is preinstalled with Unity here https://docs.unity3d.com/Manual/android-gradle-overview.html
    // See official Gradle and Android Gradle Plugin compatibility table here https://developer.android.com/studio/releases/gradle-plugin#updating-gradle
    // To specify a custom Gradle version in Unity, go do "Preferences > External Tools", uncheck "Gradle Installed with Unity (recommended)" and specify a path to a custom Gradle version
    id 'com.android.application' version '7.1.2' apply false
    id 'com.android.library' version '7.1.2' apply false
    **BUILD_SCRIPT_DEPS**
}

allprojects {
    repositories {
        **ARTIFACTORYREPOSITORY**
        google()
        mavenCentral()
        flatDir {
            dirs "${project(':unityLibrary').projectDir}/libs"
        }
    }
}

task clean(type: Delete) {
    delete rootProject.buildDir
}
Additional tips
If the error persists after following these steps, here are some additional tips: make sure you are using the latest version of Unity and Gradle plugins. Also check that all SDKs and plugins installed in your project are compatible with your version of Unity. In some cases, clearing the Gradle cache can also help resolve persistent issues.
Conclusion
The "Could not resolve all files for configuration ':launcher'" error in Unity can be frustrating, but it is usually resolvable by adjusting the Gradle configuration of your project. By enabling custom Gradle templates and adding the necessary repositories, you can ensure that all dependencies are properly resolved.
Remember to always keep your development tools up to date and regularly check for dependency compatibility to avoid these types of issues. If you encounter other technical difficulties, don't hesitate to consult the Unity documentation or ask the community for help.
We hope this article has helped you resolve this error and that you can now continue developing your projects in Unity without obstacles!


0 Comments